Now You Are REALLY Reading Music!
Reading open strings and 1st fingers is a great way to start learning to read music. In the Schroeder No. 1 Exercise you learned your open strings — C, G, D, and A. Schroeder No. 2 added 1st finger and now we are adding four more notes to your toolkit using both 2nd and 3rd finger. Go up one note-name from each of the 1st finger notes you learned in Schroeder 2 to get the name of the next note:
- 3rd finger on C = E
- 3rd finger on G = B
- 2nd finger on D = F
- 2nd finger on A = C
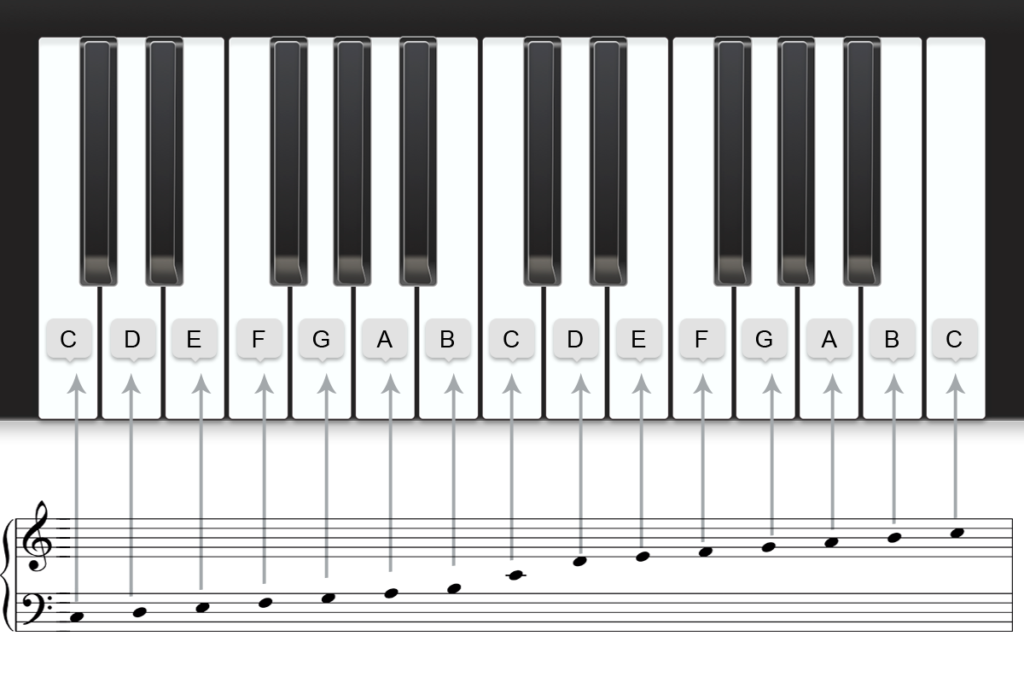
Why do we use 3rd finger on the C & G but 2nd finger on the D & A to go up one note name? Picture the piano keyboard (seen below). Note how the pattern is not reliably white-key/black-key/white-key. Between E and F and between B and C there is not a black key present. E and F are a half-step apart. On the cello in first position each finger represents a half-step reach. From the nut to 1st finger is a whole step (D to E). From 1st finger to 2nd finger is a half-step (E to F). The same pattern is present on the A-string — 1st finger is B, 2nd finger is C. However, on the C-string the pattern requires 3rd fingers because D to E is a whole-step apart. From the nut to 1st finger is a whole step (C to D). From 1st finger to 3rd finger is a whole-step (D to E). If this doesn’t make sense to you yet, that’s OKAY! Memorize the finger patterns and the names of the notes and one day when you care about the why, come back and read this post.
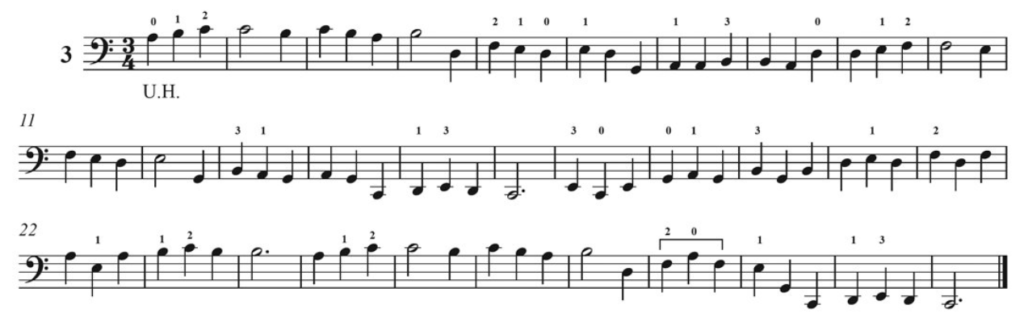
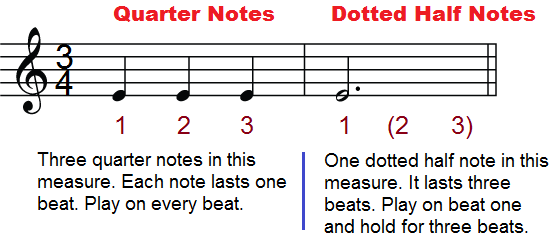
PLEASE don’t be shy about about saying the names of the notes out loud — SAY and PLAY! Just like in the video, I strongly recommend you pluck the exercise in tempo before you add the bow. The bow really is optional at this time. For now, we are working on notereading and introducing fingers gradually, teaching rhythm, and note reading. This exercise introduces the three-four meter as well as dotted half-notes. Three-four time simply means that each measure has three quarter-note beats in it. The dotted half-note is held for three beats. Half notes get two beats and whenever you see a dot after a note (as is found in measure 16, 24, and 32) that adds one half of the value of the note it follows. If all this theory is stressing you out, you can memorize the exercise using the video and worry about the asymmetrical note-naming practices, triple meters, and dotted half-notes down the road!
Pro Tip
Pros practice scales and exercises! Scales and exercises are at the foundation of all the music we play. If you learn a piece then you can play that piece. If you learn your scales and exercises then you can play just about everything!
As we learn to read music, let’s make sure that your posture is setting you up for success down the road. Here is a handy posture checklist:
- Posture – feet flat on the floor, cello between your knees, touching at your sternum, sitting straight up, shoulders relaxed, elbow out like a kickstand, straight EWP (elbow-wrist-pinkie)
- Left hand – thumb and fingers bent (making a “C”), fingers arched and contacting the string with the pad of the fingertip, thumb bent and under 2nd finger
- Bow path – bow travels straight across the string (t-bow), midway between the fingerboard and the bridge (forte-freeway)
- Bow hand – thumb slightly bent, index finger touching the stick between the first and second knuckle, hand pronated, fingers slightly apart — not overly spread or bunched together
- Keep fingers down as you play – as you ascend the scale don’t lift the finger you just played when you place the new finger. As you descend place all 4 fingers and then peel off the fingers one by one.
- Check intonation – verify your intonation. Play with the video, use a tuner, watch your hand in a mirror to check that you are on the tapes. Don’t assume, verify.