Becoming A Music Reader 1 Finger At A Time!
Learning to read music can be so easy and even fun if you just take it one finger at a time! In the Schroeder No. 1 Exercise you learned your open strings — C, G, D, and A. Schroeder No. 2 adds the 1st finger so just go up one note-name from each of those open strings to get the name of the first finger note:
- 1st finger on C = D
- 1st finger on G = A (sorry we don’t use H)
- 1st finger on D = E
- 1st finger on A = B
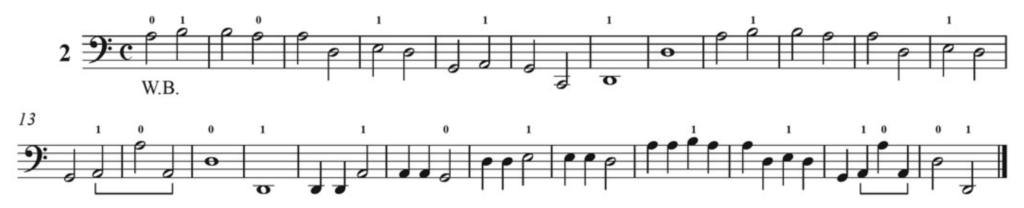
PLEASE don’t be shy about about saying the names of the notes out loud — SAY and PLAY! Just like in the video, I strongly recommend you pluck the exercise in tempo before you add the bow. Some beginners, including young beginners, may not even be using the bow at this point in their journey. Schroeder exercises are among the first assignments I give my young beginners because they do such a good job of introducing fingers gradually, teaching rhythm, and note reading. In the sheet music, the bracket connecting the A’s in measure 13-14 and again in measure 23 simply indicate to keep the finger down when plucking the open A. If you fingers are properly arched then the A string should be able to ring while you hold down the 1st finger on the G-string.
As you struggle through the exercise, just remember that there are fireworks going on inside your head as you create all these new synapses. I have three tricks to help simplify the task as you are building the brain power and coordination!
- Pluck the string. Using the bow takes a lot more brain power, especially at the start.
- Slow down the video, most of my students practice this at 0.75 speed for the first week or two. YouTube is incredible this way. Just adjust the playback speed in the menu.
- Practice with the video on your stand and if possible have a parent pointing to each note as they pass. The video provides the steady beat, a visual reference, and the name of the note. The parent prompting with a pencil helps the student track the music.
Pro Tip
FLASH CARDS! It’s old school but it works. You need to train your brain to have immediate responses to these notes so drilling with timed flash cards or a flash card app like Note Rush, is the quickest way to real mastery! Start with just the 8 notes in Schroeder 1 and 2.
As we learn to read music, let’s make sure that your posture is setting you up for success down the road. Here is a handy posture checklist:
- Posture – feet flat on the floor, cello between your knees, touching at your sternum, sitting straight up, shoulders relaxed, elbow out like a kickstand, straight EWP (elbow-wrist-pinkie)
- Left hand – thumb and fingers bent (making a “C”), fingers arched and contacting the string with the pad of the fingertip, thumb bent and under 2nd finger
- Bow path – bow travels straight across the string (t-bow), midway between the fingerboard and the bridge (forte-freeway)
- Bow hand – thumb slightly bent, index finger touching the stick between the first and second knuckle, hand pronated, fingers slightly apart — not overly spread or bunched together
- Keep fingers down as you play – as you ascend the scale don’t lift the finger you just played when you place the new finger. As you descend place all 4 fingers and then peel off the fingers one by one.
- Check intonation – verify your intonation. Play with the video, use a tuner, watch your hand in a mirror to check that you are on the tapes. Don’t assume, verify.
HAPPY PRACTICING