You Can Do This!
So if you are holding an in-tune cello with tapes installed, have practiced creating the proper left hand shape and are seated in proper cello posture — LET’S BEGIN!
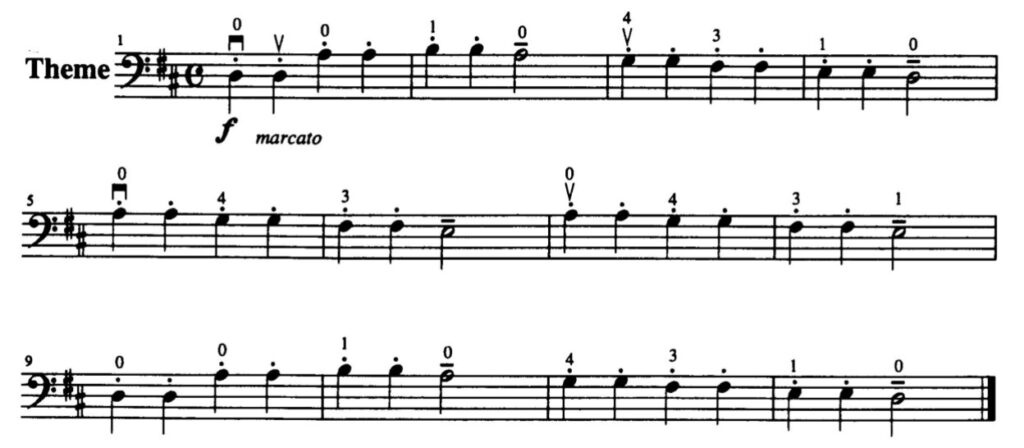
The D string is the second string on your right going from the far left of the instrument if you are looking down the fingerboard. It is the second thinnest of the strings. While reading music is a great tool, you certainly don’t have to read music to get started. Either follow along with the written-out fingering below or watch the sheet music as you play along with the video.
finger: DDAA11A-443311D-AA44331-AA44331-DDAA11A-443311D
string: aa dddddd ddddd dddd aa dddddd
One of the great things about YouTube (besides the fact that it makes learning to play the cello free) is that you can easily slow down or speed up any video. Go to the settings cog or menu icon and select playback speed. If the playback speed is too fast at first go to 0.75 speed or even 0.5 speed at which point you might think that I’ve had too much to drink! As you get more proficient you can always crank up the video to full speed or faster.
Pro Tip
Practice in front of a mirror so you can see your left hand in the mirror without having to look down and ruin your posture. Check that each finger is arched and not collapsed. You may need to practice the catapult exercises in the left hand posture video to build strength and the right hand shape.
Let’s start pizzicato or plucking the string the way the pros do! You cellists will be plucking the string for the rest of your life, so this is the time to make the proper pizzicato technique your go-to approach and save you difficulties down the road. Make an “L” with your right hand, closing the hand except for the thumb and index finger. Stabilize the hand by placing the thumb against the side of the fingerboard about halfway between the neck and the edge of the fingerboard. Use only the index finger to pluck while the other fingers are tucked away.
Especially young beginners may not have the left-hand 4th finger strength yet to pluck twinkle. Usually 20 catapults a day will build up the coordination and strength in a young beginner within a week or two. In the meantime, there are lots of pre-twinkle exercises you can do for both the left and the right hand. Start with the Schroeder No. 1 and bow hold videos and go from there.
I know you are excited to start using the bow to get that beautiful cello sound, but I highly recommend for your first song to try to master the left hand before you introduce the bow. Once you have mastered the fingering in tempo with the video, go onto the next lesson which focuses on the bow and the right hand.
Tyvm for the helpful post! I would not have gotten this myself!
Thank you so very much
Fantastic article:D Going to require a decent amount of time to think about this blog!!