I LOVE THIS SCALE!
C major 3 octave scale is one of my absolute favorites. We use every open string. We climb up to the beautiful soaring tenor register of the cello. The sympathetic vibrations really make the instrument ring. Plus, after A and B-flat major, it’s a cinch to play! Enjoy every note.
Start with 2 to 3 minutes per day of 7th position practice. Just like the 5th and 6 position exercises we did for B-flat major and A major, this practice isolates the new position to optimize your practice time. Rather than practice the entire scale each time hoping to improve the last three notes, focus in the new position until it feels comfortable and then link it with the whole. C major feels like home to me. There are no extensions. Fourth position is easy if you’ve practiced your slide-whistle exercises. And 7th position is exactly like 6th position only easier because you can check the first finger with open A.
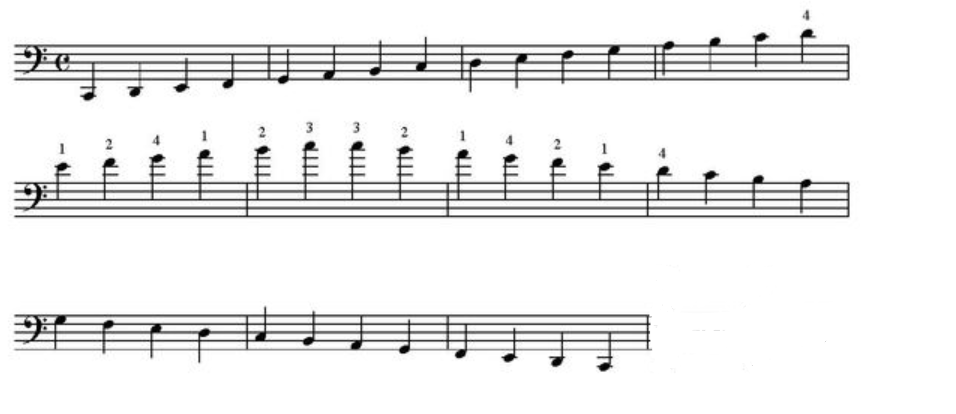
C major three octave scale fingering starts on open C-1-3-4-G-1-3-4-D-1-2-4-A-1-2-4-shift to 4th position 1-2-4- shift to 7th position 1-2-3 then back down 2-1-4-2-1-4-2-1-A-4-2-1-D-4-3-1-G-4-3-1-C
The most common struggle students have in this scale is keeping 2nd finger high enough in 7th position. The hand always seems to want to return to equidistant spacing between 1st, 2nd and 3rd finger. Make a mental note to create a large whole step between 1st and 2nd finger. Those with thick fingers like me, may even have 2nd and 3rd finger touching. The thumb should be touching the side of the neck. We generally keep the thumb behind until 8th position when the 3rd finger is over D. This places the thumb over the harmonic and becomes home base for all our thumb position work.
Pro Tip
Harmonics are very handy cheats! Pros use them all the time to guarantee intonation and mask shifts. Landing on the harmonic makes shifting up to 7th position a little safer. Once you have 1st finger centered over the harmonic you can push it down to vibrato if needed. Shifting out of 7th position, let the harmonic ring while you adjust the hand back to 4th position. The harmonic will ring for a bit even after your finger leaves the spot. This gives you a little extra time to shift back without hearing the slide.
Please take the time to master C major separate, two, four, and eight notes per bow. This is the last scale major I teach before introducing thumb position. If you are still struggling with any of the healthy habits — arching your 3rd finger, or keeping a bent thumb, airing out your elbow, or sitting with upright posture — then now is the time to address those habits before adding the new world of complications that come with thumb position.
Here is the checklist one more time:
- Posture – feet flat on the floor, cello between your knees, touching at your sternum, sitting straight up, shoulders relaxed, elbow out like a kickstand, straight EWP (elbow-wrist-pinkie)
- Left hand – thumb and fingers bent (making a “C”), fingers arched and contacting the string with the pad of the fingertip, thumb bent and under 2nd finger
- Bow path – bow travels straight across the string (t-bow), midway between the fingerboard and the bridge (forte-freeway)
- Bow hand – thumb slightly bent, index finger touching the stick between the first and second knuckle, hand pronated, fingers slightly apart — not overly spread or bunched together
- Keep fingers down as you play – as you ascend the scale don’t lift the finger you just played when you place the new finger. As you descend place all 4 fingers and then peel off the fingers one by one.
- Check intonation – verify your intonation. Play with the video, use a tuner, watch your hand in a mirror to check that you are on the tapes. Don’t assume, verify.