How to Play Song of The Wind New Techniques
Learning to play Song of the Wind from Suzuki Book 1 for Cello involves some new technique for both your left and right hands. This previews video goes over both of these new techniques in detail. Practice along until you feel you have mastered the techniques. Long after Song of the Wind is an ancient memory, you will be using pivot fingers and bow lifts. Do not be in such a hurry to play the piece that you fail to learn the lessons the piece was intended to teach. Each of these early pieces is lays a stone in the foundation of the technique that you will use for your entire cello-journey!
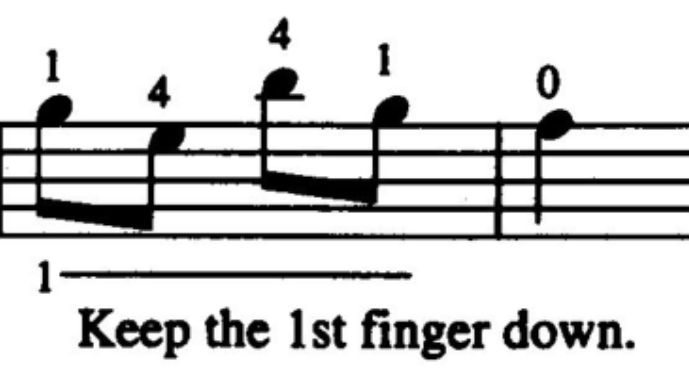
Pivot Fingers – Keeping fingers down has been a topic thoroughly covered in previous lessons starting with the very first scale you learned — D Major One Octave. It is the bedrock skill taught in the left hand catapult exercise, and is one of the reminders you find in the “handy” cello posture checklist found at the bottom of this and most of these early lesson blogs. So what is the difference between a pivot finger as found in Song of the Wind and just keeping fingers down as we learned to do in the Lightly Row preview lesson? A pivot finger acts as a hinge to hold your hand in place as another finger alternates between the two strings. The pivot finger grounds the hand so that the 4th finger can swing between the D-string and A-string. You may need to reach up slightly with the 4th finger when it lands on the D-string since the finger is pivoting in a rotational arc not a straight line. Don’t be surprised if you need to watch your 1st finger to force it to stay down as it will certainly want to lift up with the other fingers. Eventually, with practice, you will find that using the pivot finger method creates a much faster motion and with better accuracy than hopping back and forth between the two strings.
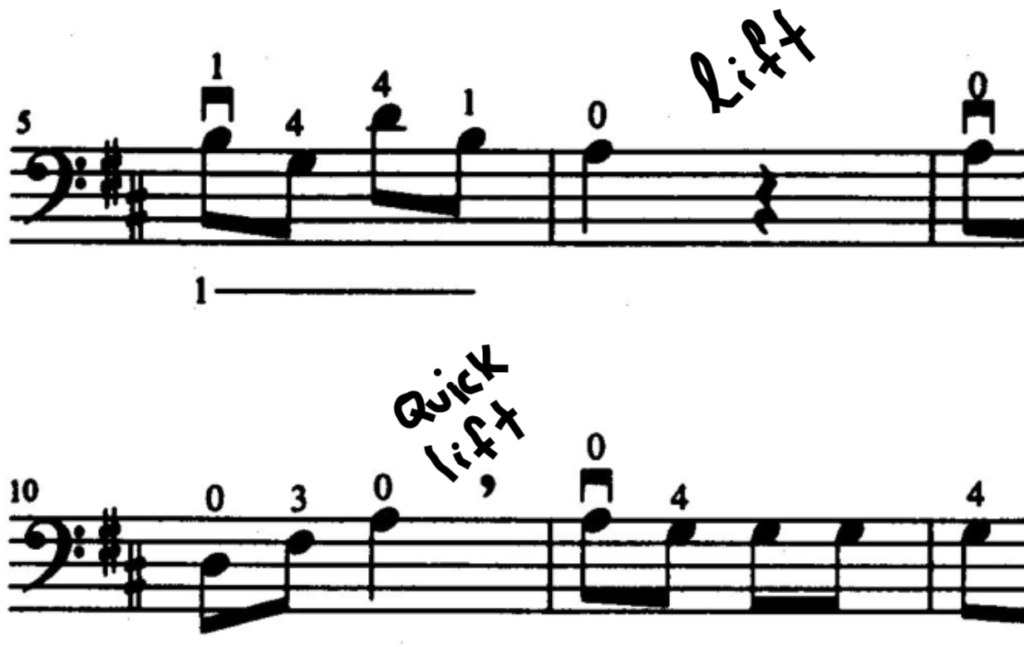
Bow lifts – Bow direction matters and cellists like all string players have a strong preference for playing downbeats (beat 1) on a downbow (starting at the frog and moving towards the tip). Since measures do not always have an even number of notes in them, you can see how retaking the bow to start downbow would be a frequently occurring technique. In fact, from here on out you will be doing bow lifts in most of the subsequent pieces in the cello Suzuki books. Different teachers use different terminology — lift, retake, and circle bow are the most common. In measure 6, you have a full beat to retake try saying out loud “lift-set” as you move the bow with me in the video. As the downbow motion is nearing its end, at the point you might change direction and go upbow, lift the bow off the string and trace an oval in the air such that the bow travels smoothly back to the typical starting point of a downbow just below the sliver winding or about 3 inches from the frog. In measure 6, you have plenty of time to make the retake or bow lift motion and then set the bow on the string before pulling horizontally. It is always preferable to start from the string rather than land on the string and pull horizontally simultaneously. In measure 10, there is no rest to accommodate the travel in the air so we cut the quarter note just a little short and do a quick lift. If the lift in measure 6 is a watermelon, then the lift in measure 10 is a pear. Same motion, just smaller and done more quickly.
Pro Tip
Bow direction matters — pros take bow direction VERY seriously! In an orchestra you could lose your job even if you play all notes perfectly but play them in the wrong bow direction. Bow direction influences tone, articulation, dynamics and phrasing. Early on and when playing on your own, you may struggle to grasp the importance of correct bow direction — but you will be doing yourself a BIG favor if you stop and correct yourself every time you catch yourself playing backwards bow.
As we learn how to play Song of The Wind on the cello, let’s make sure that your posture is setting you up for success down the road. Here is a “handy” posture checklist:
- Posture – feet flat on the floor, cello between your knees, touching at your sternum, sitting straight up, shoulders relaxed, elbow out like a kickstand, straight EWP (elbow-wrist-pinkie)
- Left hand – thumb and fingers bent (making a “C”), fingers arched and contacting the string with the pad of the fingertip, thumb bent and under 2nd finger
- Bow path – bow travels straight across the string (t-bow), midway between the fingerboard and the bridge (forte-freeway)
- Bow hand – thumb slightly bent, index finger touching the stick between the first and second knuckle, hand pronated, fingers slightly apart — not overly spread or bunched together
- Keep fingers down as you play – as you ascend the string don’t lift the finger you just played when you place the new finger. As you descend place all 4 fingers and then peel off the fingers one by one.
- Check intonation – verify your intonation. Play with the video, use a tuner, watch your hand in a mirror to check that you are on the tapes. Don’t assume, verify.