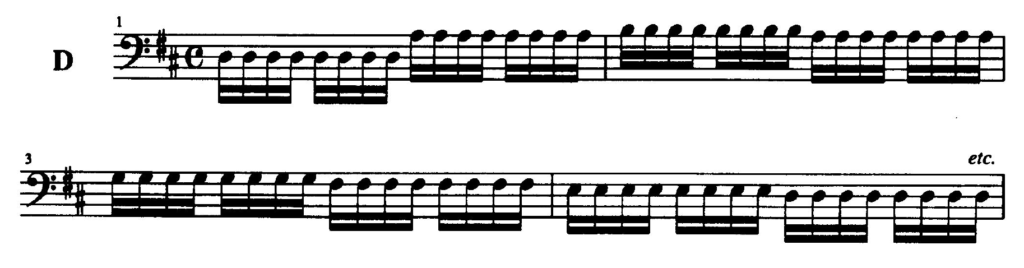
Twinkle Twinkle Little Star Variation D
Why learn Twinkle Variation D next? The straight sixteenth note rhythm is more straightforward than the mixed rhythms found in Variations B & C. The order is less important than acquiring all the skills, I just want my students to be as successful as they can be from the very start. The teacher’s job is to present material in such a way that the student progresses and is successful every step along the way!
Twinkle Twinkle Little Star Variation D is especially tiring if you play the constant sixteenth notes in the lower half of the bow. Moving the heavy shoulder through all those small motions will tire out the arm in a hurry. If you have developed the natural bow stroke taught in previous lessons, then Variation D is an excellent opportunity to build confidence using the middle of the bow. Isolating the bow motion to the middle of the bow by bowing from the elbow instead of the shoulder greatly reduces the energy needed to keep up the unrelenting sixteenth notes. Using the smaller forearm motion is not only more efficient, it is faster and easier to control.
If you are struggling to coordinate the left and right hand motions together in tempo, don’t forget that you can slow down the video using the YouTube menu. Slow and steady wins the race! Give you brain time to do it all in stride by slowing down the task while you build the muscle memory. Be sure that you begin each group of four down bow. Every time you place your finger you will be down bow. Where you are starting in the middle of the bow and pulling down it is very common to get backwards on your bow. Use your eyes! Watch your bow while you play.
Pro Tip
Professionals are very intentional about what part of the bow they use. You may want to create a visual reminder to help you know where to start your bow. This can be done with tape on the wood of the bow or a pencil mark on the back of the hair.
Before moving onto the next video, double check that your posture is setting you up for success down the road. Here is a handy posture checklist:
- Posture – feet flat on the floor, cello between your knees, touching at your sternum, sitting straight up, shoulders relaxed, elbow out like a kickstand, straight EWP (elbow-wrist-pinkie)
- Left hand – thumb and fingers bent (making a “C”), fingers arched and contacting the string with the pad of the fingertip, thumb bent and under 2nd finger
- Bow path – bow travels straight across the string (t-bow), midway between the fingerboard and the bridge (forte-freeway)
- Bow hand – thumb slightly bent, index finger touching the stick between the first and second knuckle, hand pronated, fingers slightly apart — not overly spread or bunched together
- Keep fingers down as you play – as you ascend the string don’t lift the finger you just played when you place the new finger. As you descend place all 4 fingers and then peel off the fingers one by one.
- Check intonation – verify your intonation. Play with the video, use a tuner, watch your hand in a mirror to check that you are on the tapes. Don’t assume, verify.